Creating a stunning gallery wall is a fantastic way to showcase your personal style and bring character to any room. Whether you want to display family photos, artwork, or a mix of both, a well-arranged gallery wall can transform a plain space into a dynamic focal point. In this guide, we’ll walk you through the steps on how to easily layout and install a gallery wall, from selecting the perfect pieces to arranging and hanging them with precision.
With the right approach, you can create a cohesive and visually appealing display that suits your taste and enhances your home’s décor. So, whether you’re a DIY enthusiast or just looking to add a personal touch to your walls, follow these simple tips to get started on your gallery wall journey and make your space uniquely yours.
10 Points On How to Easily Layout and Install a Gallery Wall
Designing a gallery wall is a creative way to display your favorite photos, artworks, and memorabilia, adding a personal touch to any room. Below are ten detailed steps to help you layout and install your gallery wall effortlessly.
1. Choose the Right Wall

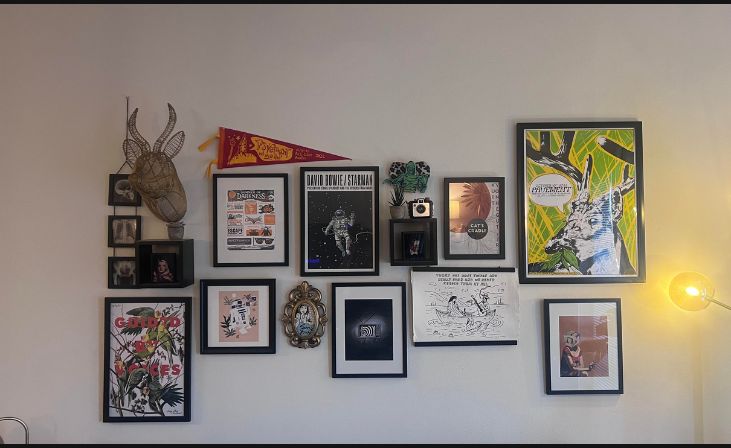
Start by selecting the perfect wall for your gallery. Ideal locations include living room feature walls, hallway corridors, above staircases, or over furniture like sofas and beds. The wall should have enough space to accommodate your frames without looking overcrowded. Consider the surrounding décor and how the gallery wall will complement the room’s overall aesthetic. A well-chosen location helps your gallery wall become a stunning focal point that draws attention and enhances your home’s design.
Choosing the right wall also involves considering lighting conditions. Walls with natural or spot lighting can highlight your gallery and make the artwork pop. If the space is dim, think about adding some lighting, like picture lights or wall sconces, to showcase your pieces. Remember, the location sets the stage for your gallery wall, so take your time in selecting the perfect spot.
2. Decide on a Theme and Color Scheme
Deciding on a theme and color scheme gives your gallery wall a cohesive look. Themes can range from family photos, travel snapshots, abstract art, botanical prints, or even a combination of different styles. The key is to ensure all the pieces work well together. If you prefer a more eclectic style, focus on a unifying element like a consistent color palette or matching frame materials to tie everything together. A well-thought-out theme helps the gallery wall feel intentional and curated rather than random.
Your color scheme should complement the room’s existing décor. If your space features neutral tones, consider adding vibrant art pieces for a pop of color. Alternatively, if the room is already colorful, you may want to stick with more muted, monochromatic artwork to avoid overwhelming the senses. Planning your theme and color scheme in advance ensures a balanced and visually appealing gallery wall.
3. Select and Gather Your Artwork
Once you have a theme in mind, it’s time to gather your artwork and prints. You can mix different types of art, such as photographs, paintings, prints, and even textiles. Don’t hesitate to incorporate meaningful items like personal photos, travel souvenirs, or hand-drawn sketches for a truly unique display. The variety of pieces adds texture and depth to your gallery wall, making it more engaging.
When selecting artwork, consider the size and scale of each piece. A good mix of large, medium, and small items creates visual interest and prevents the display from feeling flat. Keep in mind that the artwork should resonate with you and reflect your personal style. This is your opportunity to showcase pieces that inspire you or hold sentimental value.
4. Choose the Right Frames
Choosing the right frames is crucial in creating a cohesive gallery wall. Frames come in various styles, colors, and materials, such as wood, metal, or acrylic. To achieve a unified look, opt for frames that share a common characteristic, such as color, material, or shape. For instance, a gallery wall with all black frames creates a sleek, modern aesthetic, while a mix of rustic wooden frames can give a more eclectic, bohemian feel.
Don’t be afraid to mix and match different frame styles, as long as there is an underlying harmony that ties them together. For example, you can use a combination of vintage and modern frames but keep them all in a similar color palette. The frames should enhance the artwork without overpowering it, so choose wisely to ensure a balanced look.
5. Create a Layout on the Floor
Before putting nails in the wall, it’s essential to create a layout on the floor. This helps you visualize the arrangement and make adjustments without committing to a permanent setup. Start by placing the largest piece in the center and build outward, arranging the smaller frames around it. Leave consistent spacing of 2-3 inches between frames to maintain a balanced look.
Experiment with different configurations until you find the one that feels right. If you’re unsure, try taking photos of each layout variation with your phone to compare and decide. This step allows you to fine-tune the arrangement, ensuring a visually appealing design once it’s transferred to the wall.
6. Use Paper Templates to Plan Your Wall Layout

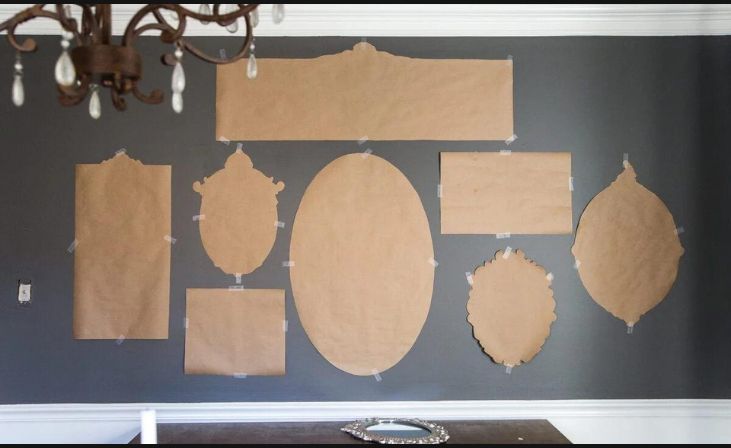
To avoid unnecessary holes in your wall, use paper templates of each frame size. Cut out pieces of paper or newspaper to match the dimensions of your frames, then tape them to the wall using painter’s tape. Arrange the templates on the wall according to your chosen layout from the floor. This method allows you to make adjustments to the positioning and spacing before committing to nails or hooks.
Once you’re happy with the arrangement, mark where the nails or hooks should go. Using paper templates makes the hanging process much smoother and more precise, ensuring that your gallery wall turns out exactly as planned without any guesswork or mistakes.
7. Measure and Mark the Wall for Hanging
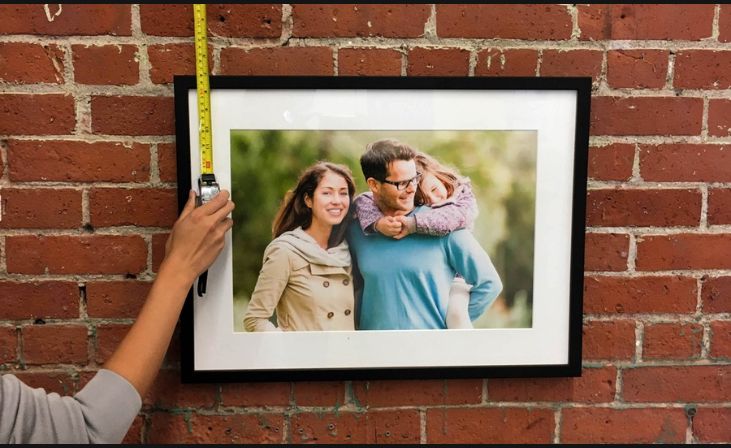
Accurate measuring is key to a professional-looking gallery wall. Use a tape measure, level, and pencil to mark where each frame will hang. Begin with the central piece and work your way outward, ensuring each frame is evenly spaced and aligned. Measure twice to avoid errors and use a level to keep your frames straight.
For the best results, keep the center of your gallery wall at eye level, typically around 57-60 inches from the floor. This ensures the display is easily viewable and creates a balanced look in the room. Careful measuring and marking will save you time and frustration, resulting in a clean and polished installation.
8. Use the Right Hanging Hardware
Using the correct hanging hardware is essential for both the safety and appearance of your gallery wall. For lightweight frames, simple picture hooks or adhesive strips work well, while heavier pieces may require wall anchors or screws. Make sure each frame is securely hung to avoid any accidents or shifting over time.
Be mindful of the weight distribution of each piece and use appropriate hardware to ensure they remain level and firmly attached to the wall. If you’re using hanging wires, make sure they are tight to prevent the frames from tilting forward. The right hardware keeps your gallery wall looking neat and professional.
9. Hang Your Frames and Make Adjustments

With your wall marked and hardware in place, start hanging your frames according to your planned layout. Begin with the central piece and work your way outward, following the arrangement you created with your templates. Use a level to ensure each frame is perfectly straight, and adjust as needed to keep the lines clean.
As you hang each frame, step back and assess the overall look. Make minor adjustments to spacing or alignment to achieve a balanced and harmonious display. Don’t rush this step; taking your time will ensure a gallery wall that looks expertly curated and beautifully arranged.
10. Add Finishing Touches and Enjoy
Once all the frames are hung, add any finishing touches such as small decorative elements, wall decals, or accent pieces to fill gaps or enhance the overall design. Consider adding small plants, 3D art, or even a wall clock to add extra flair. These details can elevate your gallery wall and make it feel more dynamic and complete.
After completing your gallery wall, take a moment to step back and enjoy your work. A well-executed gallery wall not only enhances your space but also serves as a personal statement of style. With careful planning, precise execution, and a little creativity, you’ll have a beautiful gallery wall that reflects your taste and transforms your room.
These steps will help you create a stunning gallery wall that brings life and personality to any space.
Conclusion
Installing a gallery wall is an enjoyable project that allows you to express your creativity while enhancing your living space. By carefully planning the layout, choosing frames that complement each other, and taking the time to hang each piece correctly, you can achieve a polished and stylish look. Remember, the key to a successful gallery wall is balance and cohesion, so don’t be afraid to experiment until you find the perfect arrangement. With these easy steps, you’ll have a beautiful gallery wall that reflects your personal style in no time.
FAQs
What is the best way to arrange a gallery wall?
Start by laying out your frames on the floor to experiment with different arrangements before committing to one on the wall.
How high should a gallery wall be hung?
Gallery walls should generally be hung at eye level, with the center of the arrangement about 57-60 inches from the floor.

